As a Network Administrator efficiency is key during the deployment phase of any project. Efficiency is one of the benefits that come with integrating ACI and Nutanix along with:
-
Automatic creation of a Subnet in the Nutanix Cluster whenever an EPG is deployed in Cisco ACI.
-
Statistics and Visibility within ACI.
-
Support for intra-EPG policies (intra-EPG contract is not supported).
Pre-requisites
-
You need connectivity to both Prism Central and Prism Elements on their Console/API port (default: TCP 9440).
-
You must have an account with Cluster Admin role.
-
Your Cisco ACI environment must be 6.03e or above.
Step 1: Prepare the Environment
Before starting the integration, ensure that you have the necessary infrastructure and configurations in place.
-
Nutanix Cluster: Ensure that Nutanix is set up and configured.
-
Cisco ACI Fabric: Verify that the ACI fabric is properly deployed, with leaf and spine switches configured. This assumes that Interface Group Policies, VLAN Pools, Attached Access Entity Policies and Physical Domains are already configured
-
Connectivity: Ensure physical and logical connectivity between Nutanix and Cisco ACI.
-
APIC (ACI Controller): Verify that the Cisco ACI Application Policy Infrastructure Controller (APIC) is operational.
Step 2: Creating the VMM Domain
-
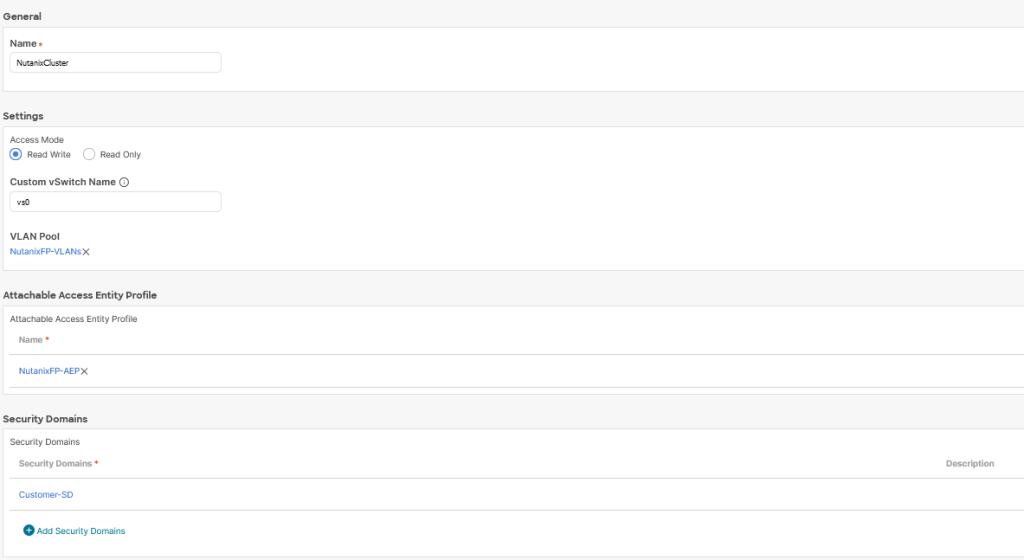
In the APIC GUI, navigate to Virtual Networking > Nutanix.
-
Select Actions and in the drop down menu select Create Domain.
-
Enter the following information:
-
Name – name of the VMM Domain
-
Custom vSwitch Name – this is the name of the existing vSwitch in the Nutanix Cluster. If left blank, ACI will create a new vSwitch automatically.
-
VLAN Pool – these are the VLANs that will be assigned to the Subnets in Nutanix.
-
Attachable Access Entity Profile – Add an Attachable Access Entity Profile (AAEP) that are associated to that vSwitch. Ensure that the VLAN Pools are also associated to the AAEP via a Physical Domain
-
Security Domains – Select a Security Domain to enable RBAC policies
-
-
-
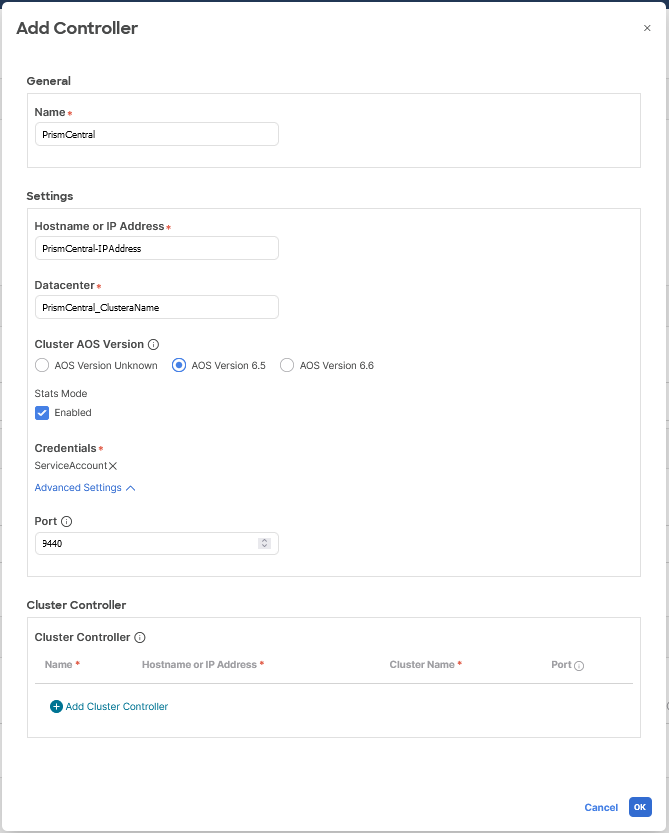
Add Controller – This is where you add the Prism Central details.
-
Name – Name of the Prism Central instance/cluster
-
Hostname or IP Address – The IP address of the Prism Central
-
Datacenter – Name of the Prism Central instance/cluster
-
Cluster AOS Version –
-
Stats Mode – Check the box to enable Stats Mode
-
Select Credential – Enter the Credentials of a Cluster Admin
-
Advanced Settings > Port – Enter the Console/API port (default: TCP 9440)
-
-
-
-
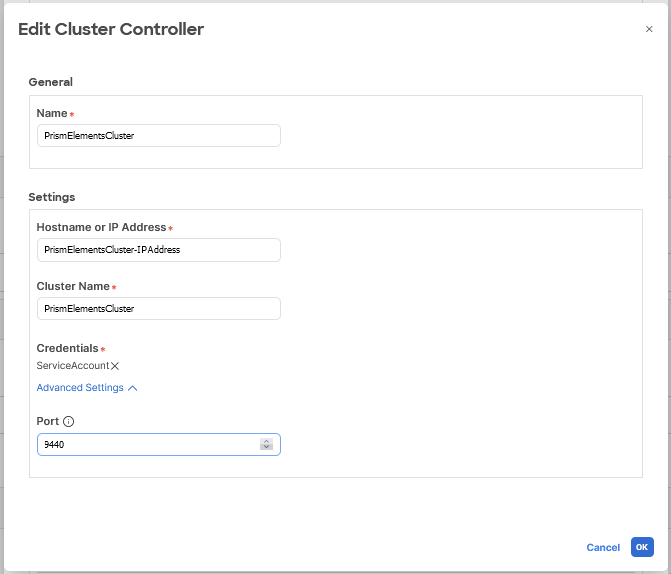
Add Cluster Controller – This is where you add the Prism Elements details.
-
Name – Enter the Cluster name of the Nutanix Cluster
-
Hostname or IP Address – The IP address of the Prism Elements
-
Cluster Name – Enter the Cluster name of the Nutanix Cluster
-
Select Credential – Enter the Credentials of a Cluster Admin
-
Advanced Settings > Port – Enter the Console/API port (default: TCP 9440)
-
-
-
Select Save.
-
Open the newly created VMM Domain and select the Event Analytics tab to check for faults
Step 3: Configure Cisco ACI
-
Create a Tenant:
-
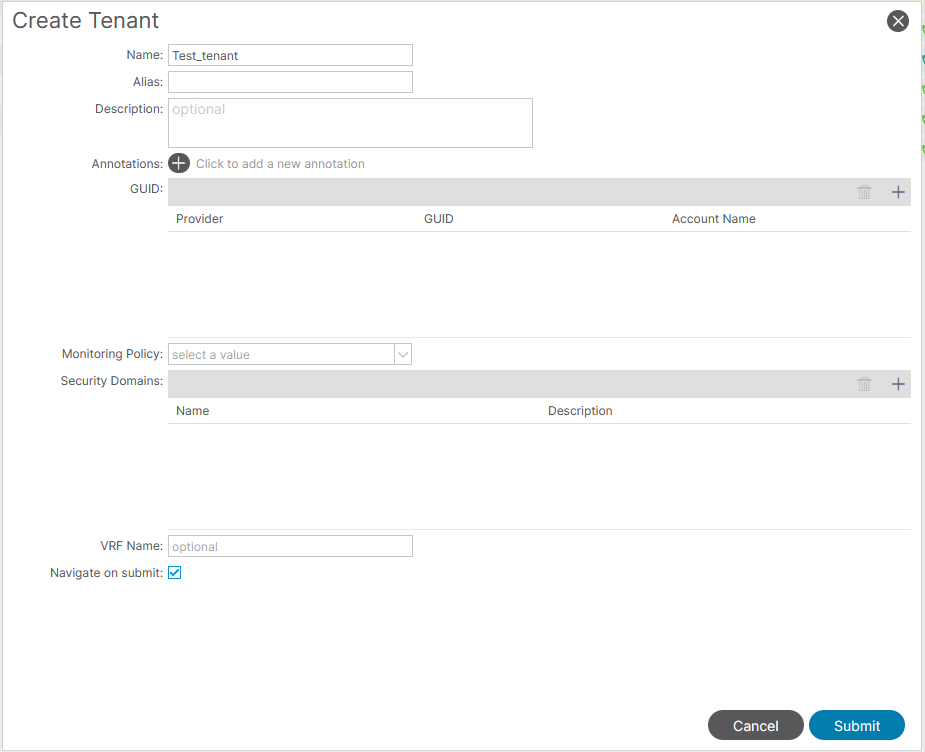
Open the APIC console and navigate to Tenants.
-
Click on Add Tenant, give it a relevant name (e.g., “Nutanix-Tenant”), and define its policies and permissions
-
-
Create VRF and Bridge Domains:
-
Still in the tenant, under Networking > VRFs create a Virtual Routing and Forwarding (VRF) instance.
-
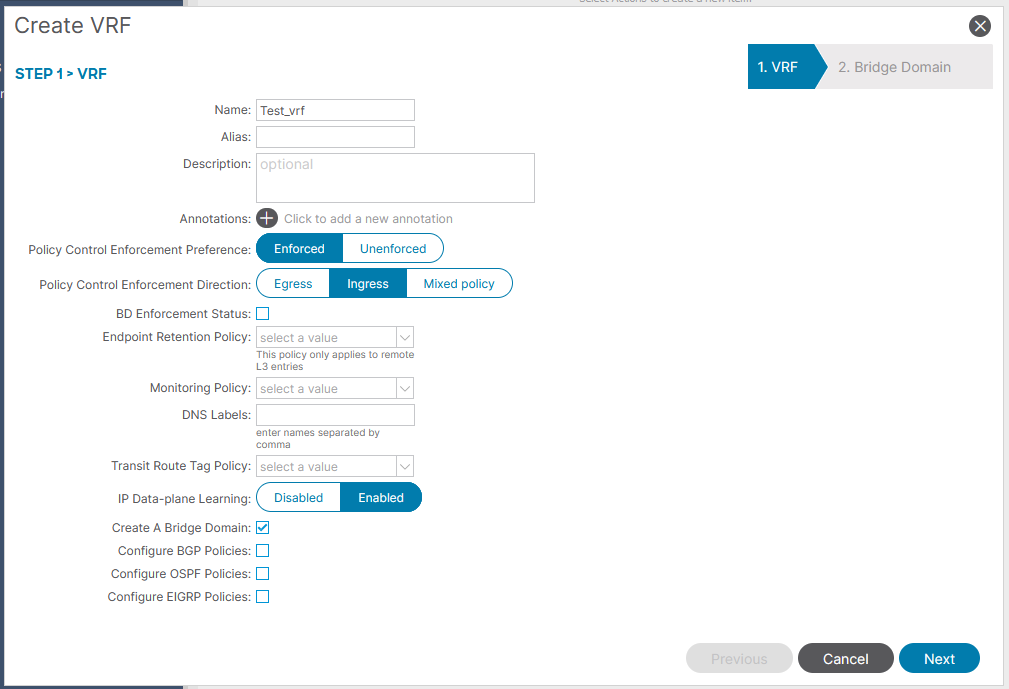
-
- Select next and create a Bridge Domains (BDs)
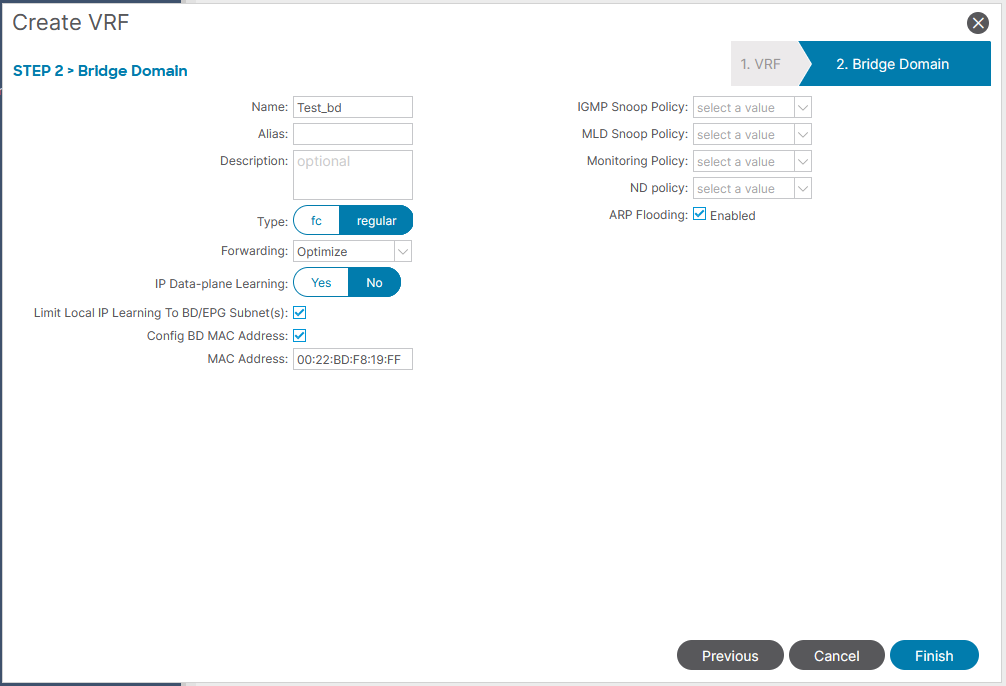
-
- Under Bridge Domain > Test_bd > Subnets, create a Subnet to create your Gateway.
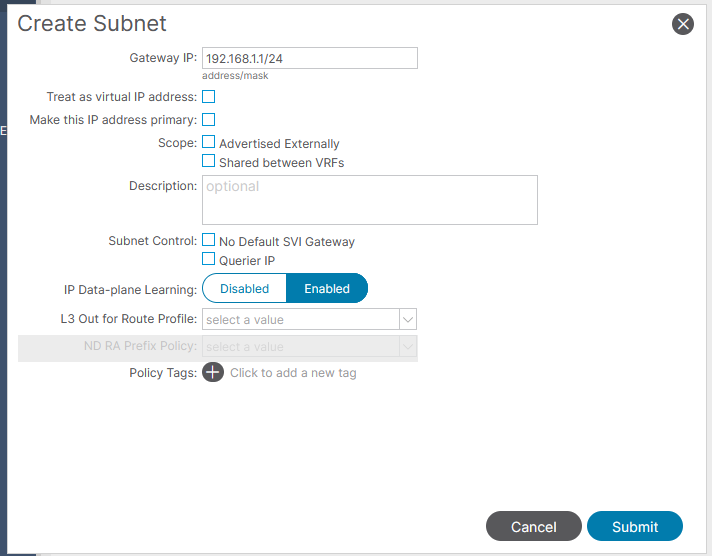
-
Define Application Profiles and Endpoints:
-
Create Application Profiles under the newly created tenant.
-
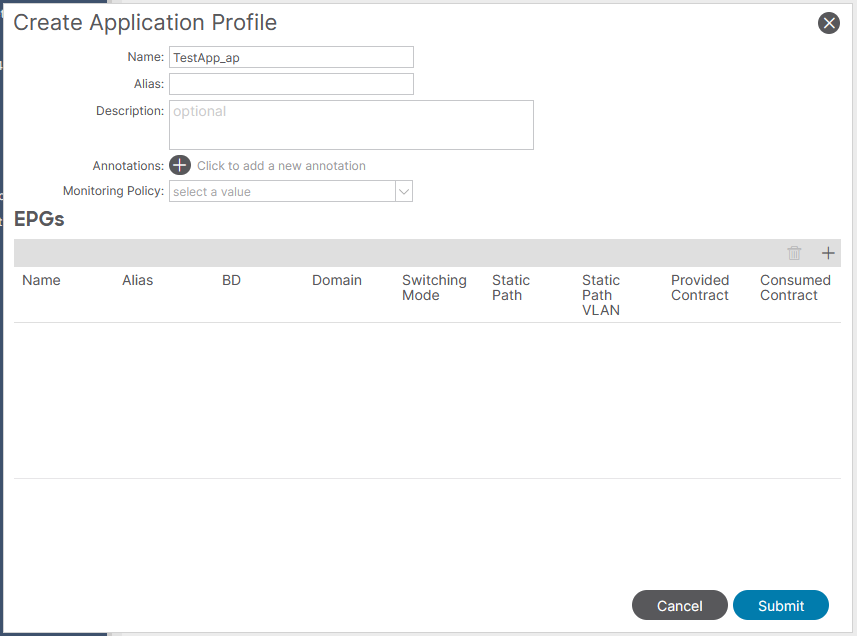
-
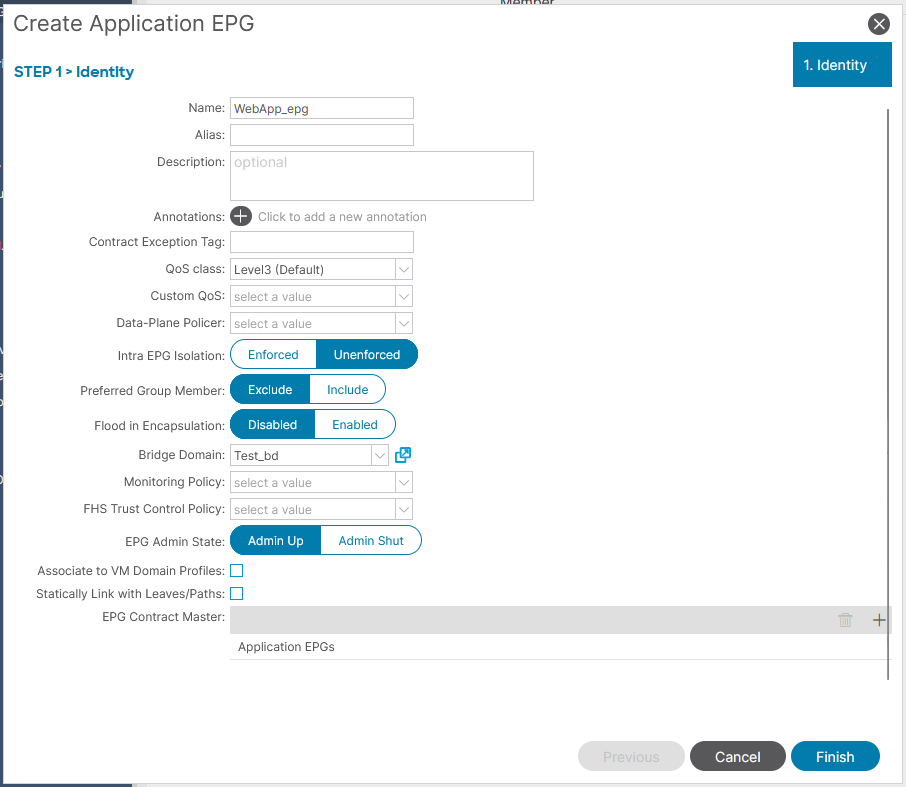
- Create Endpoint Groups (EPGs) for the Nutanix clusters, associating them with the bridge domains.
-
Associate the VMM Domain:
-
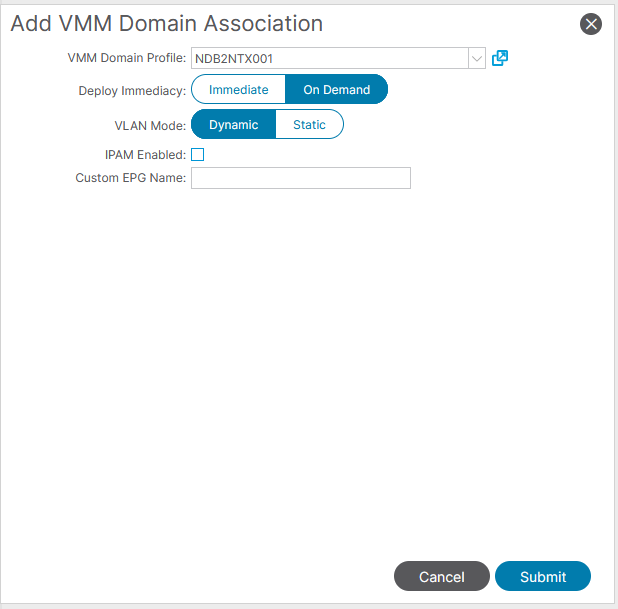
In the newly created EPG, under Domains (VMS and BareMetals) create a new association to the VMM Domain
-
-
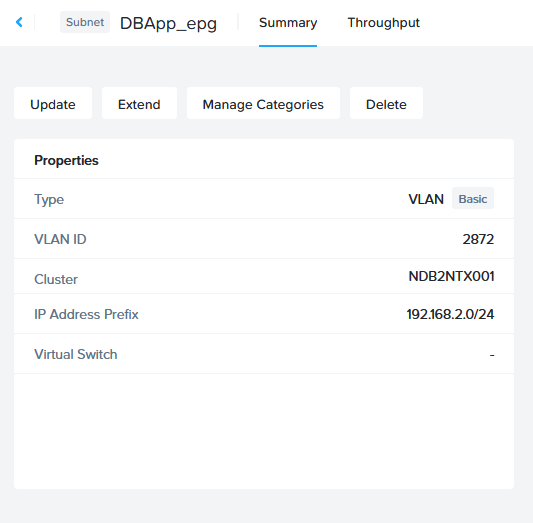
- This will automatically create a Subnet in the Nutanix Cluster with an automatically assigned VLAN ID.

- This will automatically create a Subnet in the Nutanix Cluster with an automatically assigned VLAN ID.
Step 4: Testing
-
Spin up a Test Virtual Machine (VM) inside the Nutanix Cluster and attached the newly created Subnet to it. On the VM check to see if you can ping the Gateway Address and if contracts have been configured other VMs in different EPGs.
Monitoring and Troubleshooting
-
Monitoring of the Nutanix Integrations in ACI isn’t necessary as it should continue to work as long as there are no changes to the network or the services accounts. Emantra has had issues where the Nutanix Integration with ACI would “disconnect“ and we had to re-integrate it back in again. But after upgrading from 6.03e (this was when the integration was first introduced) to 6.03g this issue resolved itself.
-
In terms of troubleshooting looking at the Event Analytics of the Nutanix Integration or the Faults tab of an EPG will give you an idea of what the issue is. Emantra has seen issues where the character length of the Subnet has been exceeded. To get around this problem is to use Custom EPG Name field which will simply just name the Subnet with Custom EPG Name instead of the entire ACI EPG Tree.
If you need more help get in touch with our professionals using our contact us form.


